How to Crochet a Magic Circle
Jump to:
Want to crochet a magic circle, but don’t know where to start? You’ve come to the right place! Learn how to make a magic circle with the simple step by step photo and video tutorials below.
This easy to learn crochet technique is also referred to as a magic ring or magic loop. Some people find a magic circle intimidating or hard to understand, but we promise it’s not! This simple crochet method only takes a minute to set up, and it’s a great way to start crochet projects worked in the round.

This post contains affiliate links. If you use these links to buy something we may earn a small commission which helps us run this website.
How to Crochet a Magic Circle
Materials:
- Worsted weight yarn(or other yarn type)
Equipment:
Instructions:
Make a magic circle:
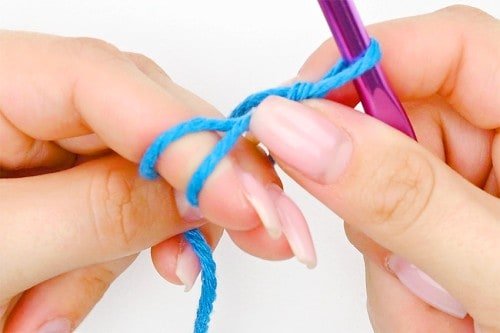
- Set the end of the yarn against your non-dominant hand, on your middle and pointer fingers.Use your thumb to hold the yarn tail by your middle finger.


- Wrap the working yarn down the back of your pointer and middle fingers.


- Bring the yarn back around to the front of your fingers, crossing the working yarn over the first wrap to form an “X” shape.


- Insert your crochet hook under the first wrap.


- Use your hook to grab onto the second wrap.


- Pull the second wrap under the first wrap.


- The working yarn should now be on your hook as a loop.


- Yarn over. (Wrap the working yarn around your crochet hook.)


- Pull the working yarn through the loop on your hook to create a new loop (completing a chain stitch).


- You should now have a somewhat secure circle with one loop on your hook.


- Carefully remove the circle from around your fingers.


- Your magic circle is complete!


Insert single crochet into your magic circle:
- You can now begin inserting single crochet into the circle.Make sure you insert the stitches over both the loop and the tail.


- Continue inserting single crochet into the circle, however many your pattern requires.The ring will still be quite open at this point, which is okay.


- Simply pull the tail of the magic circle to bring the stitches together.


- Continue pulling until the stitches tighten and form a circle, with little to no gap in the center.


- You can then insert your pattern’s next stitch.This will usually be a slip stitch into the first stitch or, if you’re working in continuous rounds, a single crochet into the first stitch.


- Your magic circle (with single crochet) is complete!


Helpful Tips:
- When inserting your hook into the magic circle (MC), make sure you’re working over both the loop/circle and the tail.
- Make sure that your magic loop isn’t too big, or else it may be difficult to insert your stitches. You can pull the tail gently to make your ring smaller.
- Weave the tail into the magic ring to secure to your circle in place.


How many chains does your magic circle need before inserting stitches?
To secure the magic circle you’ll yarn over and pull the working yarn through, creating a chain stitch. The number of chains made at this point will depend on what stitches your pattern uses in round 1, and will generally count as the first stitch of the round.
Here’s a general guideline:
- Single Crochet (sc): Chain 1 (as described in the tutorial above)
- Half Double Crochet (hdc): Chain 2
- Double Crochet (dc): Chain 3
- Triple Crochet (tr): Chain 4.


When should you use a magic circle?
You can use a magic circle for any pattern that’s crocheted in the round (aka that starts with a circle). Here are some projects where a magic circle can be used:
- Amigurumi
- Granny squares
- Hats (for patterns that are worked from the top down)
- Doilies or Mandalas
- Coasters
- Placemats


Why is a magic circle better than the chain method for crocheting in the round?
There are two main ways to crochet in the round. The first method is a magic circle. The second method is to make a slip knot, chain 2, and then insert your stitches into the first chain from the hook.
Both of these techniques work well to crochet a circle, but the magic ring is often preferred because of the following reasons:
- Adjustable tightness. Unlike with the chain method, the center hole of a magic circle can be pulled as tight as you’d like.
- Easier to insert stitches. It’s a lot easier to form the stitches in the loop, rather than into one tiny chain.
- Neater finish. When the circle is pulled tight, it provides a cleaner, more seamless, look. It’s especially good for amigurumi, so the stuffing won’t show through.


Use the clever and versatile magic circle to start your circular crochet patterns. You can substitute a magic ring for any pattern that calls for the chain 2 method.
Whether you’re a beginner or an experienced crocheter, the magic loop is an easy technique that will give you a tightly closed circle to start off your project!


