Crochet Pumpkin
Jump to:
This crochet pumpkin is such a fun and easy fall craft! Follow our step by step photo and video tutorials and download our FREE printable pattern to make this super cute harvest decoration.
These crochet pumpkins are so simple to make and they look so festive! Use basic stitches, easy enough for beginners, and transform a flat rectangle into a pumpkin shape! This homey piece of fall decor is such a fun DIY project for Halloween and Thanksgiving, and it also makes a great homemade gift.

This post contains affiliate links. If you use these links to buy something we may earn a small commission which helps us run this website.
How to Crochet a Pumpkin
Materials:
Equipment:
Instructions:
Step 1: Find what you need
- Gather your supplies and materials.


Step 2: Make the pumpkin body
- Make a slip knot and add it onto your hook. Tighten it.


- To begin the pumpkin body, chain 16.


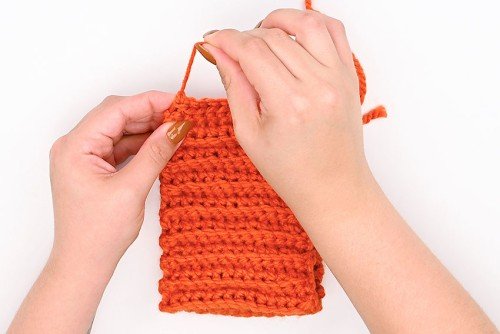
- Turn your foundation and insert 1 single crochet into each chain, starting from the 2nd chain (15 stitches total).


- Turn your work and chain 1.


- Next you’ll need to insert 1 single crochet into the back loop only of each stitch.


- Continue until you’ve added the single crochet into the back loop only of each stitch across (15 stitches total).


- To make the rest of the pumpkin body you’ll need to repeat the previous steps.Turn your work, chain 1, and single crochet into the back loop of each stitch.


- Repeat the steps for a total of 38 rows.(36 more after the previous steps.)


Step 3: Connect the pumpkin body
- Fold the rectangle in half, so that the original foundation chain and your most recent chain are together.


- Slip stitch the rectangle together. To do this, go into the front loop of one side and through the foundation chain of the other side.


- Continue to slip stitch all the way across.


- Cut off the yarn from the ball, leaving about 12 inches extra.


- Tie off your yarn.


- Thread the tail onto a yarn needle, and sew a running stitch all the way around one edge of the pumpkin.


- Pull the end of the yarn to gather the pumpkin together and tie off your yarn.


- Fill the pumpkin body with stuffing until you reach the firmness you want. It can be as squishy or as firm as you’d like.


- Tie a new 12 inch piece of yarn to the top of the pumpkin.


- Sew a running stitch across the top, gather it together, and tie off your yarn.


Step 4: Make the pumpkin stem
- Use brown yarn to create the pumpkin’s stem. Make a slip knot on your hook and chain 6.


- Add a single crochet into each stitch across, starting on the 2nd chain from the hook (5 stitches total).


- Turn your work and Chain 1. Work 1 single crochet into each stitch across.Repeat for 8 rows total.


- Similar to the pumpkin body, fold the small rectangle in half and slip stitch the two sides together.Cut and tie off the yarn, leaving a 6 inch tail.


- Thread your yarn needle onto the tail and sew a running stitch through the top. Gather the stem together and tie off the yarn to secure it.


- Add a bit of stuffing to the stem, enough to make it firm.Use your finger or crochet hook to push down the stuffing, making sure it’s evenly stuffed.


Step 5: Make the pumpkin leaf
- Use green yarn to make the pumpkin’s leaf (or tendril). Make a slip knot and then chain 6 across.


- Add 4 single crochets into each stitch across, starting with the 2nd chain from the hook. (20 stitches total.)The tendril will begin to curl – don’t worry, it’s supposed to do this!


- Cut and tie off the yarn, leaving a tail of about 5 inches.


Step 6: Join the pumpkin pieces together
- Use the leaf’s tail to sew the tendril onto the top side of the pumpkin opening.


- Cut a 12 inch piece of brown yarn and tie a tail to the bottom of the stem.Place the stem over the top center hole of the pumpkin and sew it on.


- Use the yarn needle to sew in all the ends.We pushed the needle with the extra yarn down through the pumpkin and then used our crochet hook to push the end back in.


- Your crochet pumpkin is complete!


Helpful Tips:
- Make a whole pumpkin patch by crocheting different sizes of pumpkins. (Read how to do this below!)
- Make a traditional orange pumpkin, or create a pumpkin in any colour you’d like, for a unique fall aesthetic! We love the white pumpkins we made, but these crochet pumpkins also look fun in pastel shades or bright rainbow colours!


Download our free crochet pumpkin pattern:
Click on the link below to download our free, printable crochet pumpkin pattern! The PDF file will open in a new window.
Then simply follow along with the pattern on your device’s screen, or print the file on 8.5 x 11 (letter size) printer paper.
>>> Crochet Pumpkin Pattern <<<


What type of yarn is best for making a crochet pumpkin?
We used Bernat Softee Chunky yarn in “Pumpkin” (orange), “Forest” (green), and “Dark Taupe” (brown). This yarn is super bulky weight (yarn weight 6). We like the look of the thicker yarn, and it works up a lot quicker, but you can use any size of yarn to make these crochet pumpkins.
Using this pattern with a smaller yarn will result in a smaller/scaled down version of the pumpkin. You’ll need to adjust the hook size and the pattern if you want to create the same size of pumpkin. (Read more about the size of the pumpkin below!)
What size crochet hook do you need to make a crochet pumpkin?
The exact size of crochet hook needed will depend on what type of yarn you use. We suggest using a crochet hook 1 – 2 sizes smaller than what your yarn recommends. We used a 6.5mm hook, while our yarn suggested 8mm.
Using a smaller hook size creates less gaps between the yarn. When you use the recommended hook size you can see the stuffing through the pumpkin, which we didn’t like.


How many crochet pumpkins can you make from 1 ball of yarn?
You can make 2 pumpkins from a single ball of yarn if you use the same yarn and crochet hook size. Our yarn comes in a 3.5 ounce (100 gram) skein and contains 108 yards (99 meters) of yarn.
How can I make different sizes of crochet pumpkins?
Our crochet pumpkin is roughly 3-1/2 inches tall, with a 4-1/2 inch diameter. The exact size of the pumpkin will depend on how much tension is used.
Smaller pumpkin: To make a smaller pumpkin you can use thinner yarn. Or, chain less at the start to make a shorter foundation.
Then simply crochet fewer rows in proportion to the smaller foundation. For example, if you start with Chain 10, do a total of 24 rows. Scale down the stem and leaf to match.
Larger pumpkin: To make a larger pumpkin, chain more at the start to make a longer foundation. Then crochet more rows in proportion with the longer foundation.
We recommend at least 2 extra rows for each chain added. For example, start with Chain 22 and crochet a total of 52 rows. Scale up the stem and leaf to match.
Taller pumpkin: You can also make the pumpkin taller by making the foundation longer (chaining more at the beginning), but not adding to the amount of rows in the pattern.


This crochet pumpkin is so cute and easy to make! Use leftover yarn from your stash to make these textured yarn pumpkins for yourself, or for fall craft fairs. It’s such a fun seasonal decoration!


Here’s even more fun craft ideas:
Our book Low-Mess Crafts for Kids is loaded with 72 fun and simple craft ideas for kids! The projects are fun, easy and most importantly low-mess, so the clean up is simple!
Where to buy:
You can purchase Low-Mess Crafts for Kids from Amazon, or wherever books are sold:
Amazon | Barnes and Noble | Books-A-Million | Indiebound | Amazon Canada


